Home »
Photoshop
» CREATE A PHOTO MANIPULATION OF AN ANGEL HOLDING A TORCH
Step 1
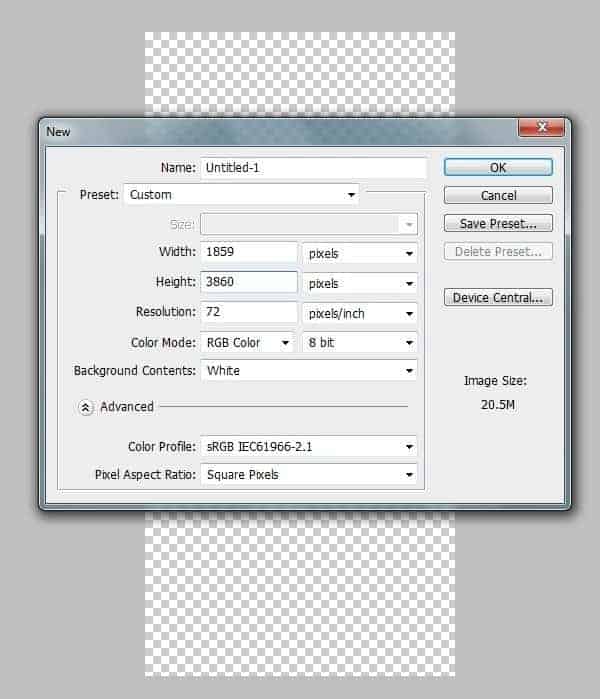
Create a new canvas with the dimensions Width=1859px and Height=3860.
Step 2
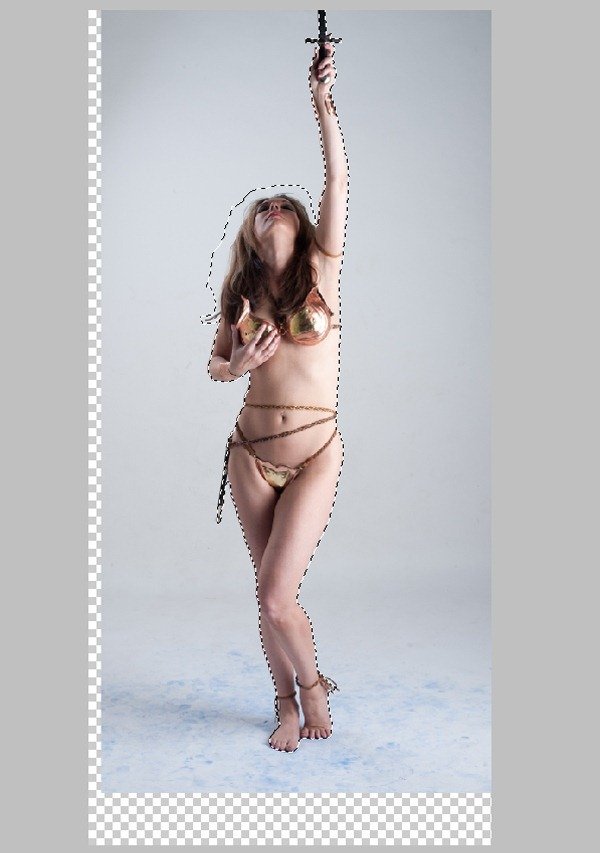
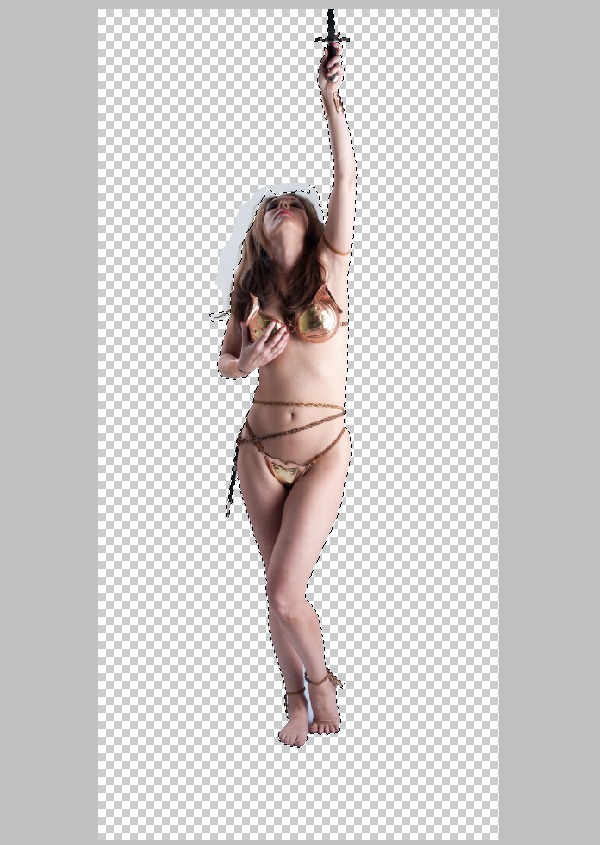
Import the image of the Woman on to the canvas and create a mask around her body. Select the mask around the hair very roughly as shown. Then separate the selection into a new layer.
Step 3
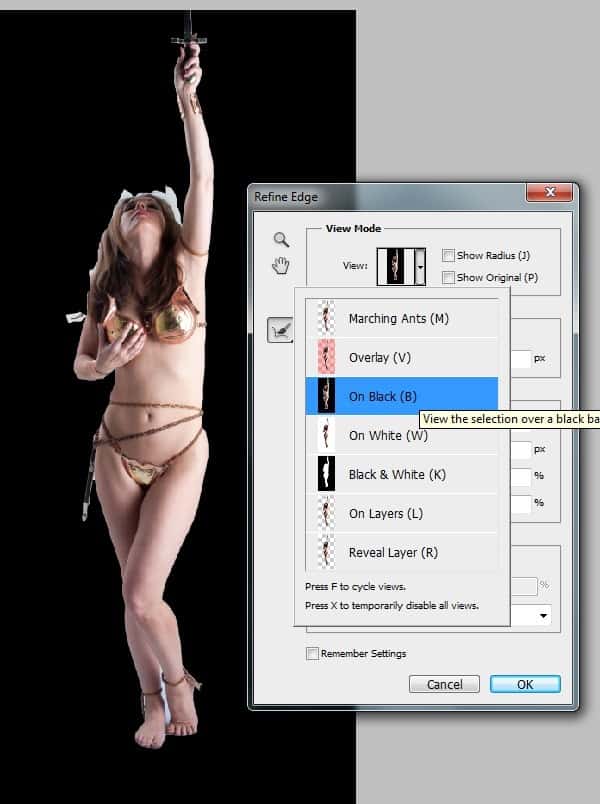
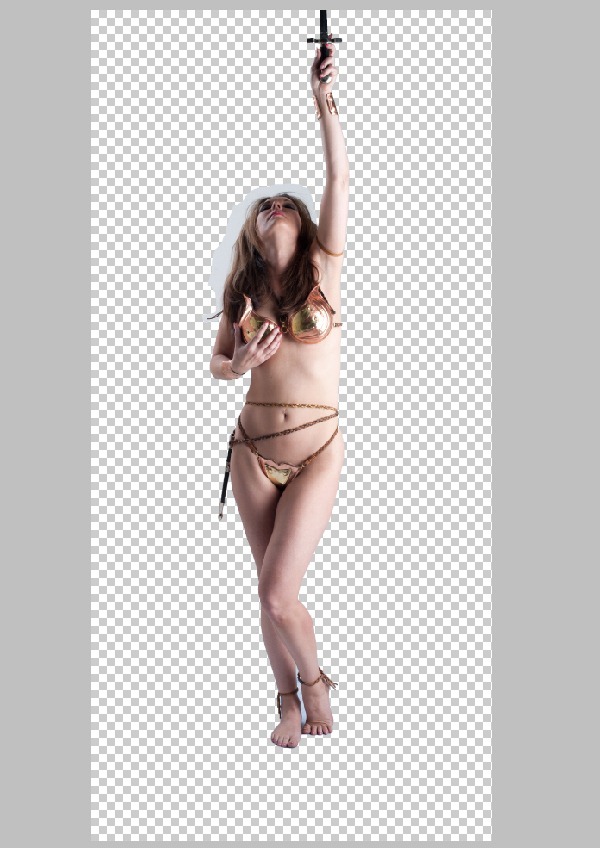
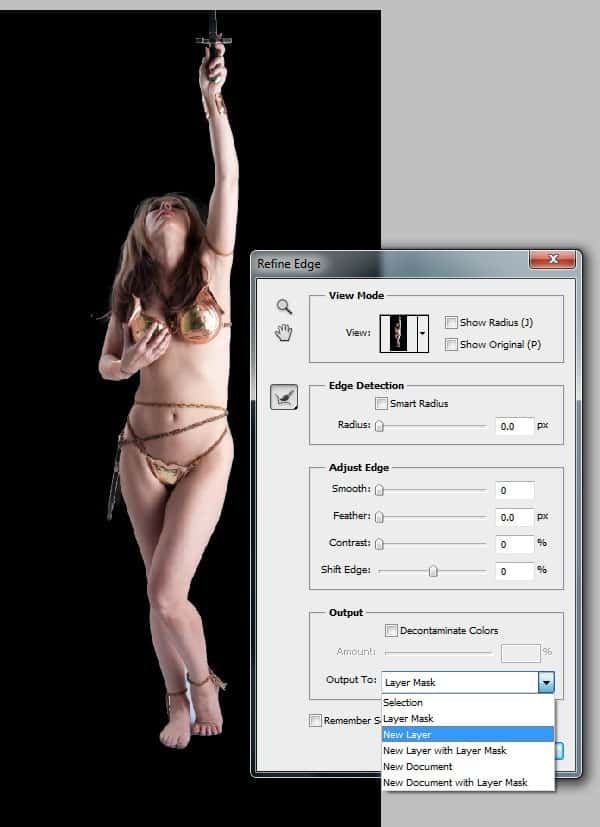
In this step we are going to us the Refine Edge Tool to mask out the hair of the women with every detail.
- Select the mask around the woman as shown using the Magic Wand Tool (W).
2) Now select the Refine Edge from Select>Refine Edge and select the On Black (B) from the View drop down list for a better view of the edge details.
Step 4
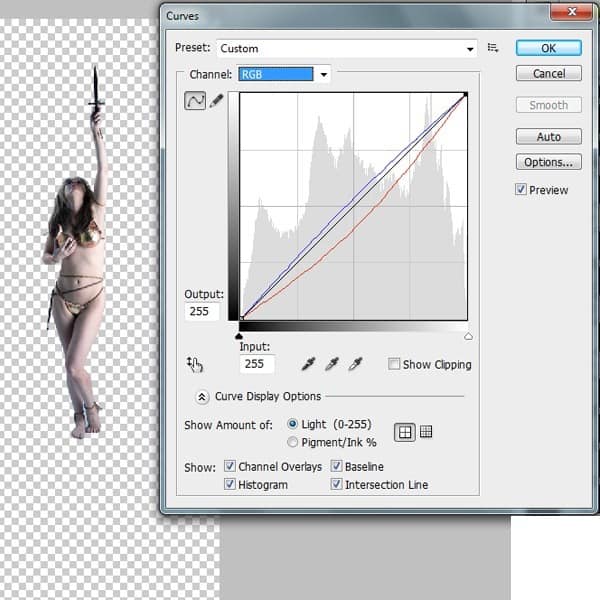
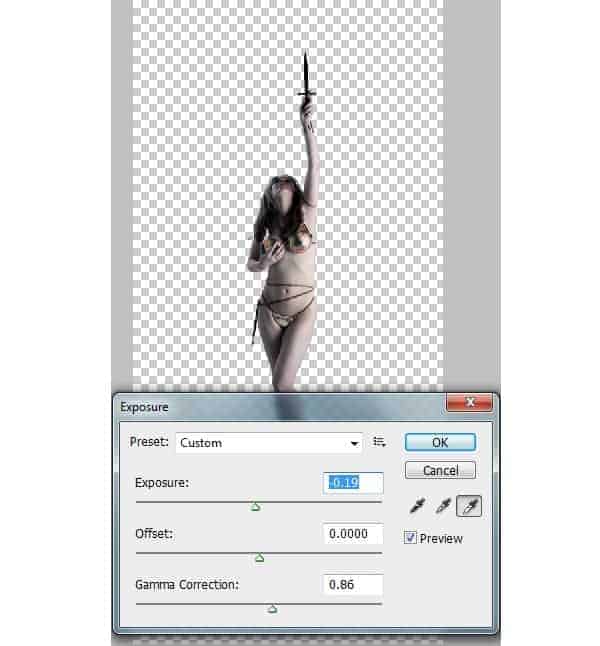
In this step we are going to color correct the image of the women.- With the women layer selected go to Image>Adjustments>Curves and set the Red and Blue curves as shown.
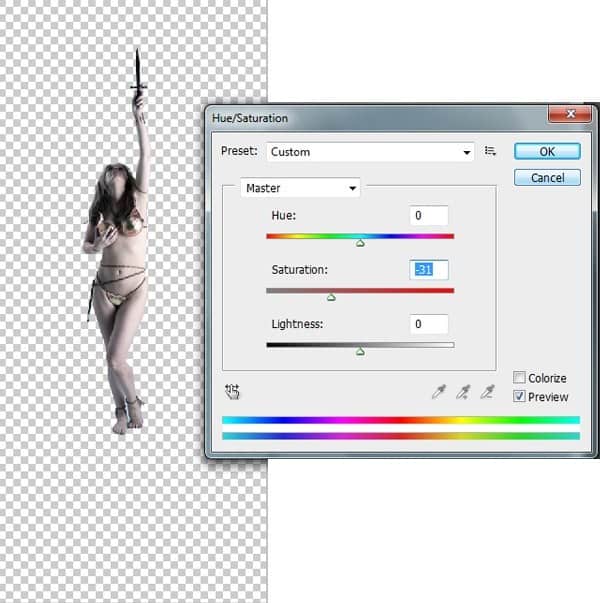
2) Now by using the Hue/Saturation De-Saturate the image to -31.3) To enhance the dark shadows on the women go to Image>Adjustments>Exposure and set the Exposure=-0.19 and Gamma Correction=0.86.
Step 5
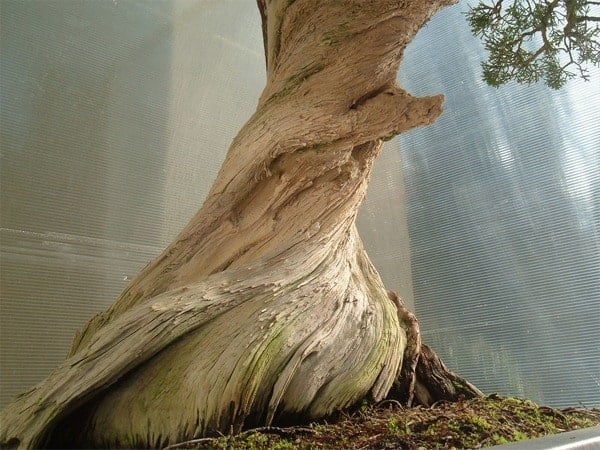
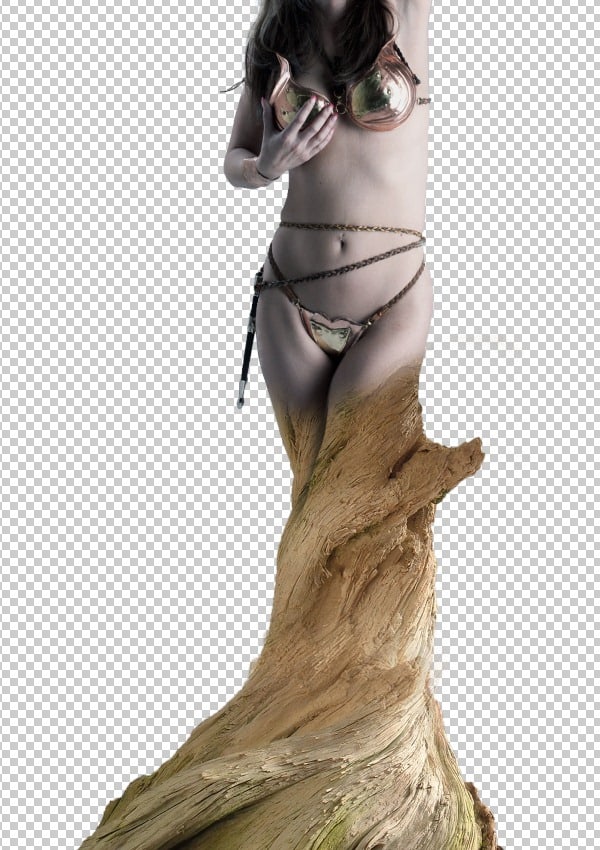
In this step we are going to create a tree bark in such a way to illustrate the women evolving from it.- Import the image of the Bonsai Bark and mask out the bark into a new layer using the Lasso Tool (L).
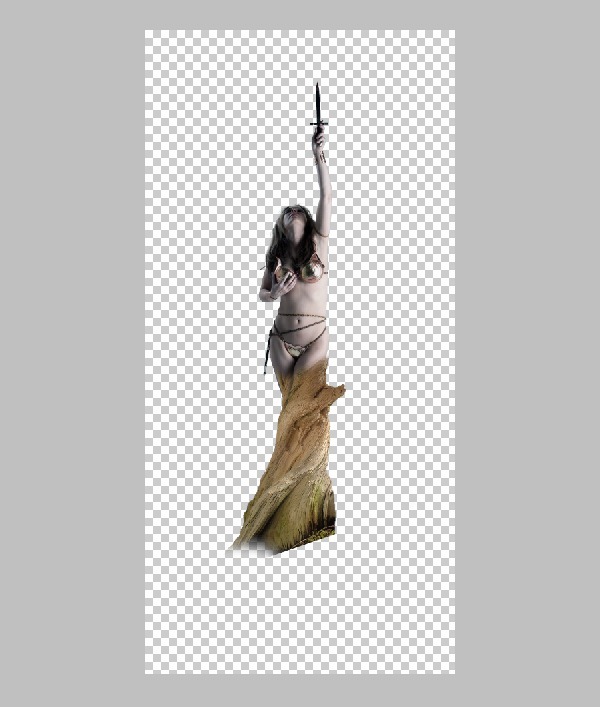
2) Now import the bark on to the working canvas and place it on the legs of the women as shown. Then erase the top end of the bark with Soft Round Brush.3) Similarly import the bark again and complete the bark as shown.
Step 6
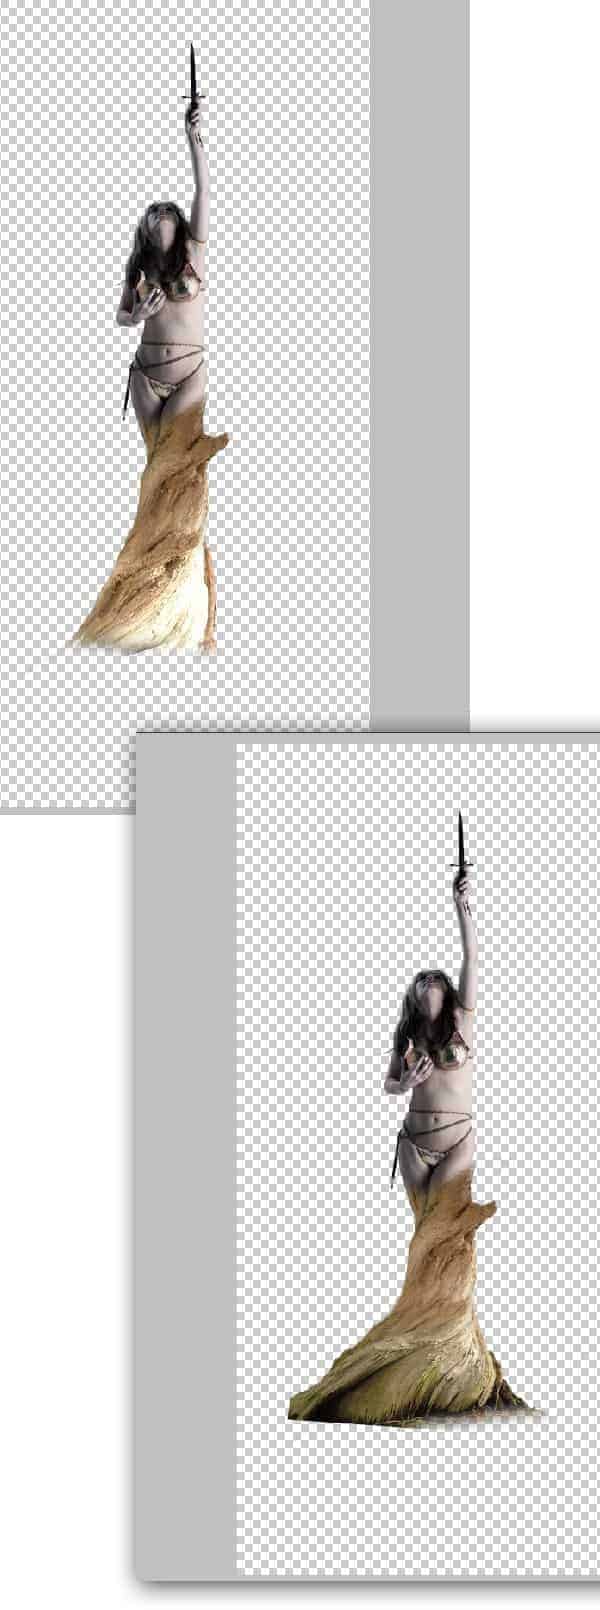
Since the woman is evolving from the bark we must show the semi evolution effect at the point of evolution. -Create the shadow line of the leg on to the bark as shown. This creates an illusion of the fold on the bark that is caused during the evolution of the women.
Step 7
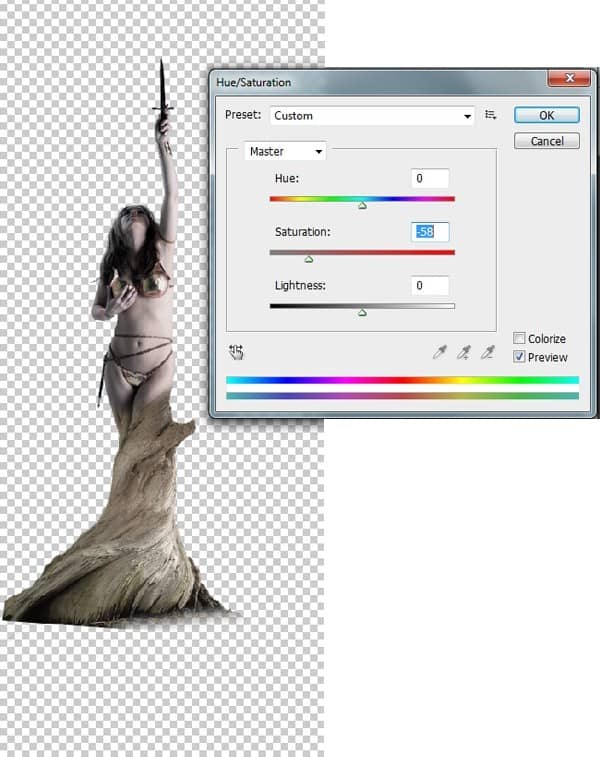
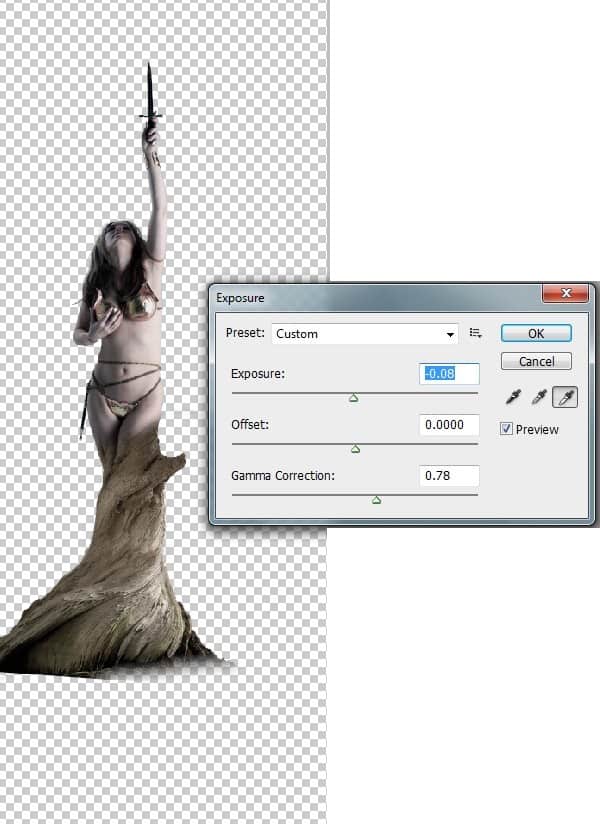
Now we need to color correct the bark in-order to blend with the women. 1) Merge the entire bark layer and go to Image>Adjustments>Hue/Saturation and de-saturate the image to -58.2) Nowby using the Exposure Set Exposure=-0.08 and Gamma correction=0.78 to enhance the shadows on the bark.
Step 8
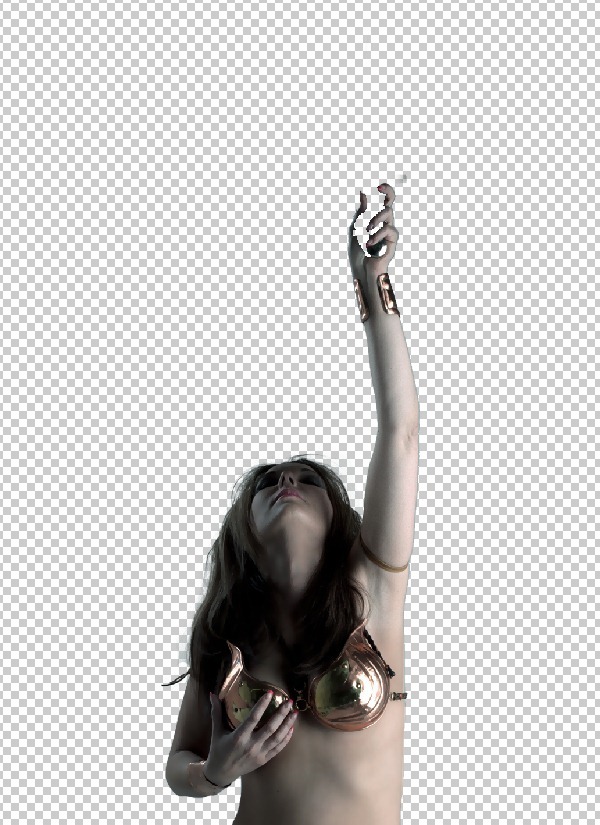
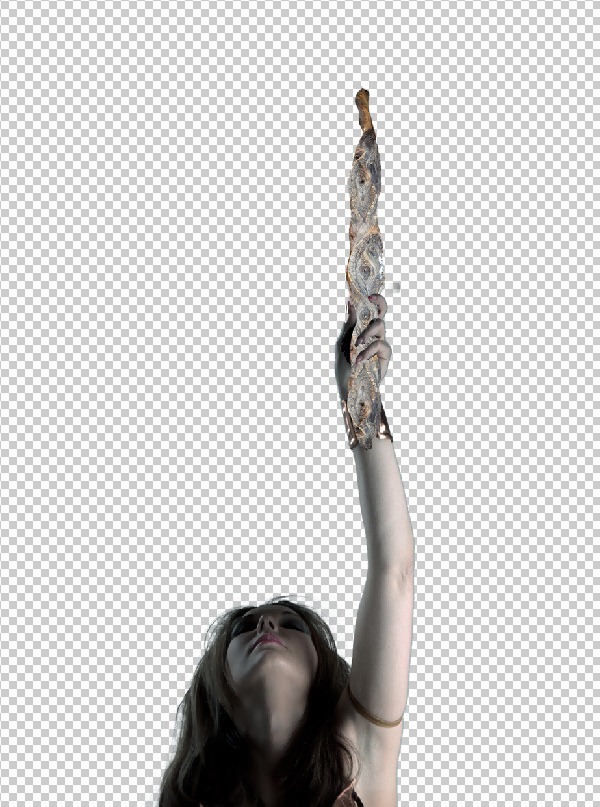
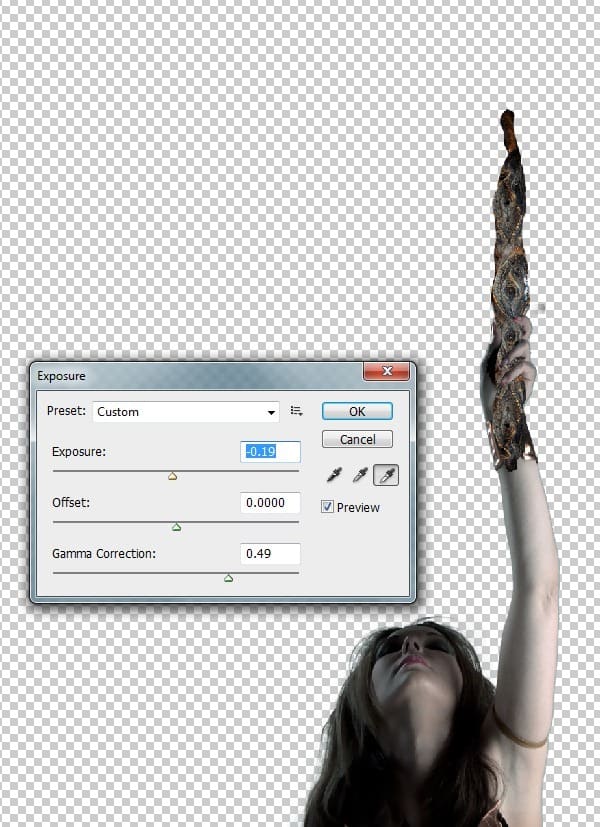
Fantasy scenes are never without a mystical object in the hands of the main character, hence in this step we are going to create a uniquely looking fire torch in the left hand of the women. 1) Erase the small knife that the woman is originally holding using the Eraser Tool (E).2) Now import the image of the Gnarled Log onto the working canvas and place it in the position as shown.3) Now erase the portion of the log to make the fingers visible, which makes the log look like it is held in the hands of the women.4) With the log layer selected go to Image>Adjustments>Exposure and set the Exposure to -0.19 and Gamma Correction to 0.49.
Step 9
Import the image of the BackGround on to the working canvas and place it as shown.
Step 10
In any photo-manipulation or matte painting works lighting plays an important role in making the scene look more convincing in all natural aspects. Hence in this scene we assume that the light source is on the right side of the scene. -Using the Soft Round Brush (B) paint the dark shadow on the left side of the women and the bark as shown.
Step 11
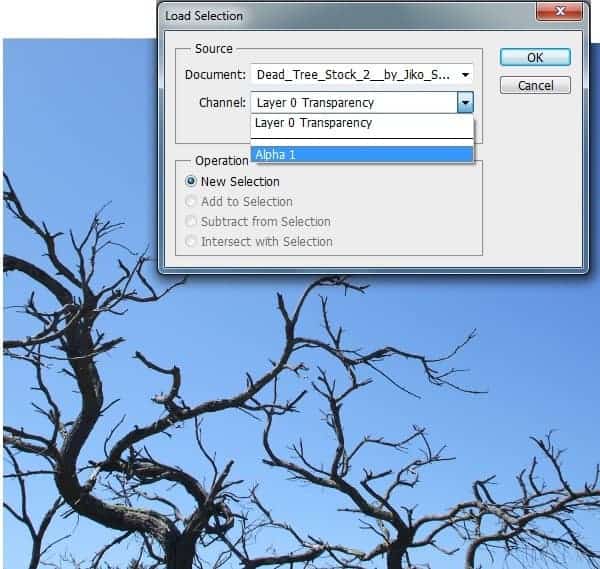
As we said in the intro that the nature is holding it's last light of hope from dying, we need to add few dead branches in the scene to create the dry feel in the scene. In this step we are going to cut the dead tree from its image and place it in our scene. 1) Import the image of the Dead Tree 1 and select the Blue Channel from the 'Channels' pallet. The go to Image>Calculations and select the Blue channel from the channel drop down list.Â2) Now by using the Levels make the image into a complete silhouette.3) Select the main image and go to Select>Load Selection and select the Alpha 1 from the Channel Drop down list and press OK to select the mask around the dead tree.4) Now separate the selection into a new layer.5) Now import the dead tree branches on to the working canvas and place them near the base of the bark as shown.
Step 12
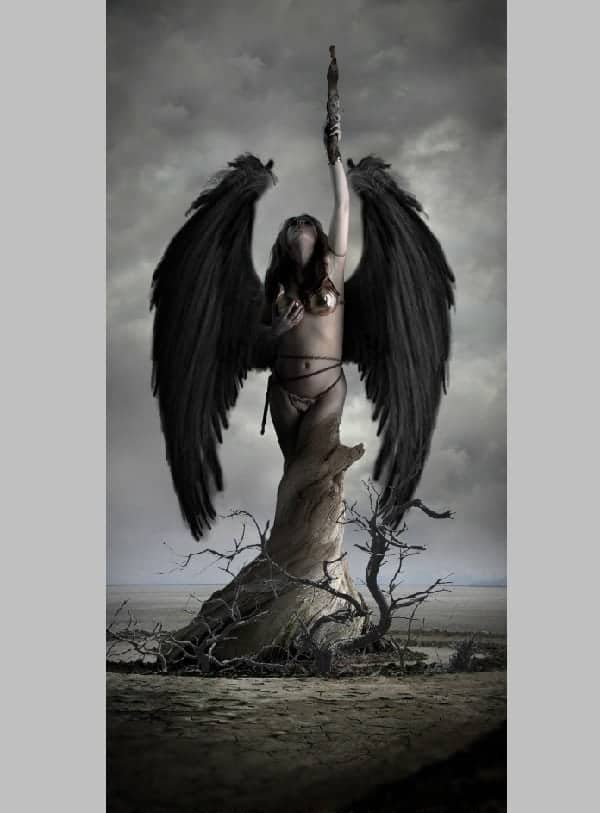
In this step we are going to add wings to the woman. 1) Import the image of the Wings into the scene and place them on the back of the woman as shown.2) Considering the lighting principles of the scene paint the dark shadow on the right wing.
Step 13
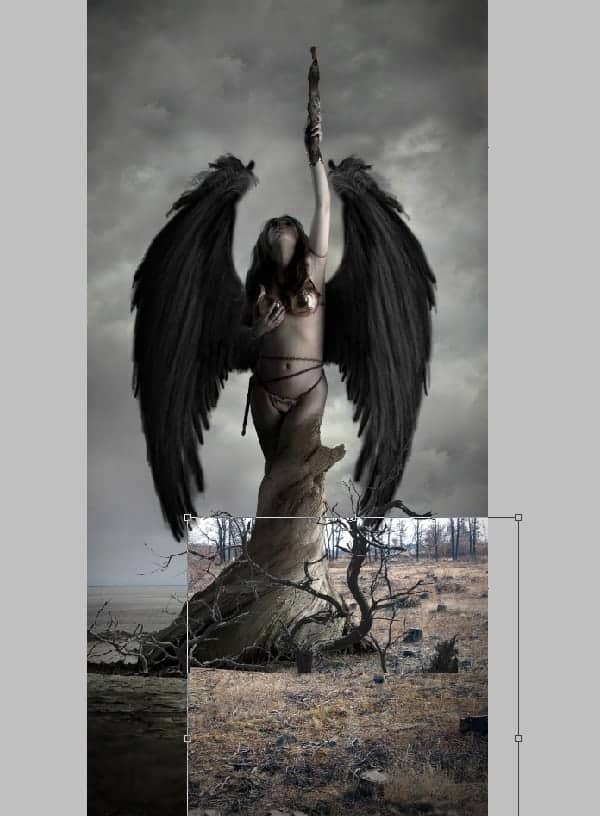
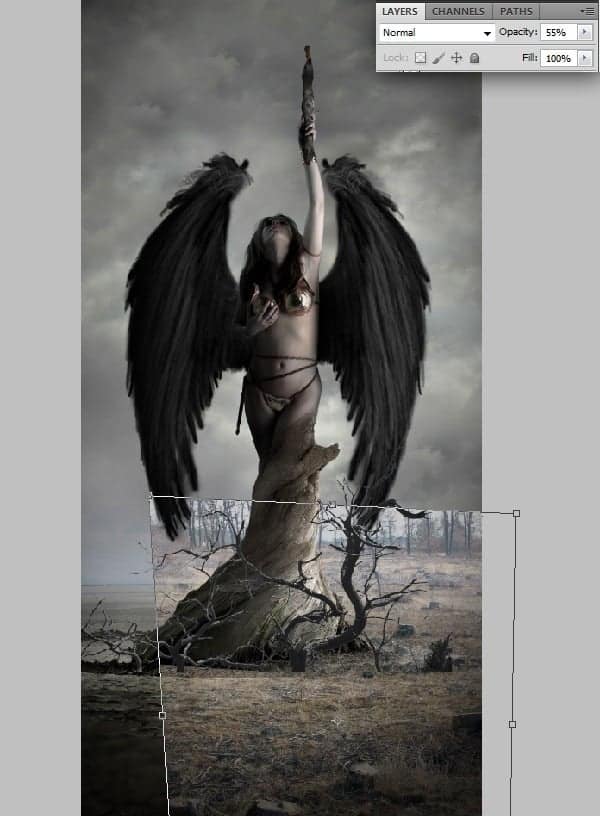
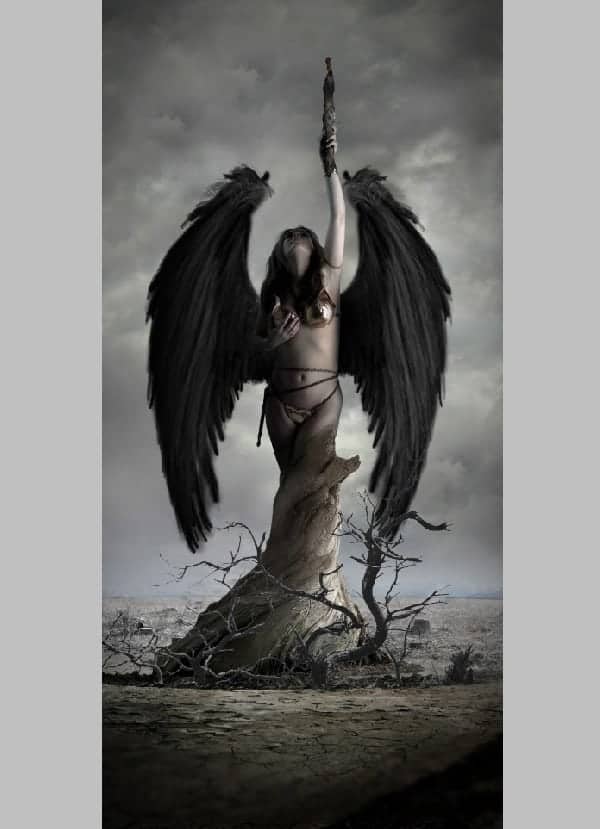
: In this step we are going to create a deforested landscape in the background. 1) Import the Deforestation image on to the canvas and place it as shown.2) Using the Move Tool (V) transform the image to fit the prospective of the scene. Lower the Opacity of the deforested image to 55% before transforming for a better view of the original image prospective.3) Now by using the Hue/Saturation reduce the Saturation level of theimage to -65.4) Now by using the Eraser Tool (E) erase the deforested image as shown, and then lower the Opacity to 76% to fit perfectly in the background.5) Similarly create the deforested landscape on the left side of the scene as shown.
Step 14
In this step we are going to add a tombstone in the scene representing the end of the nature. -Cut the Tombstonefrom the original image using Pen Tool (P), then import it onto the working canvas and place it at the bottom of the scene as shown.
Step 15
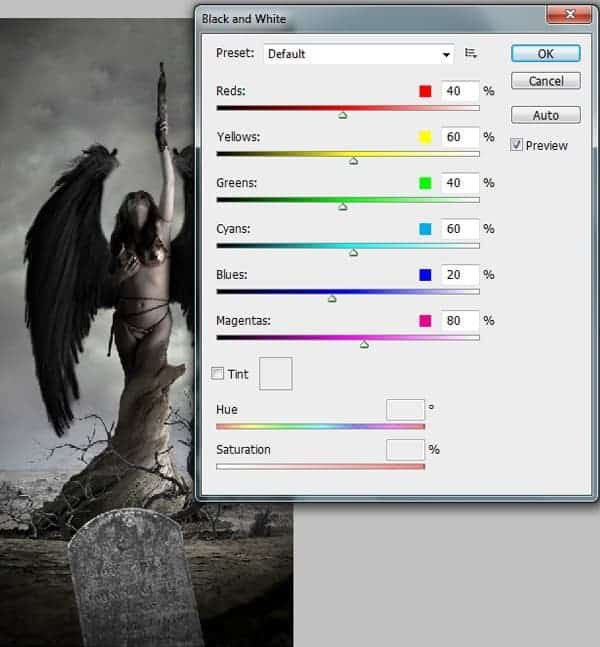
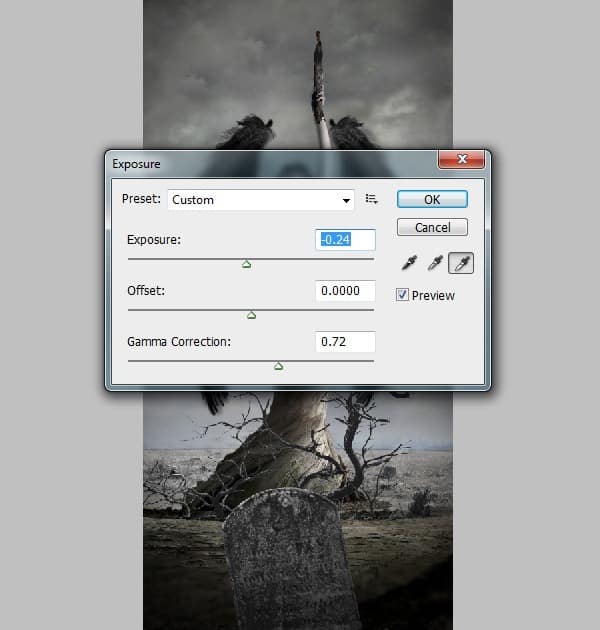
1) With the tombstone layer selected go to Image>Adjustments>Black and White and convert the image into gray scale.2) Now enhance the dark shades of the tombstone using Exposure. Set the Exposure to -0.24 and Gamma Correction to 0.72.3) Now by using the Soft Round Brush (B) paint dark shadow on the left side of the tombstone as shown.
Step 16
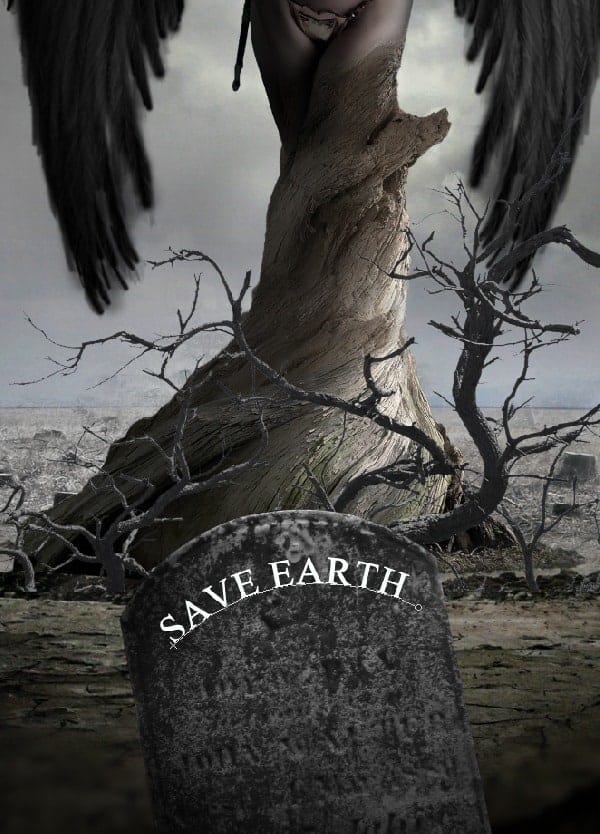
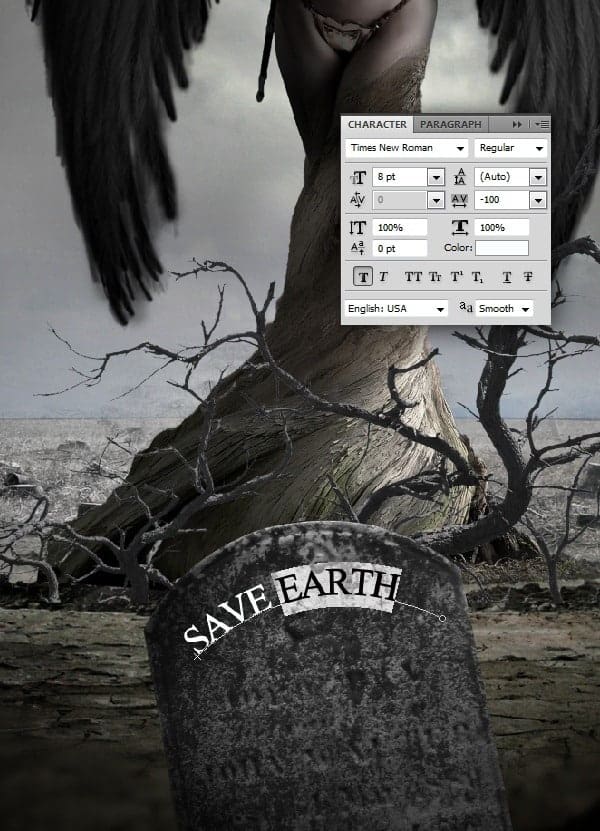
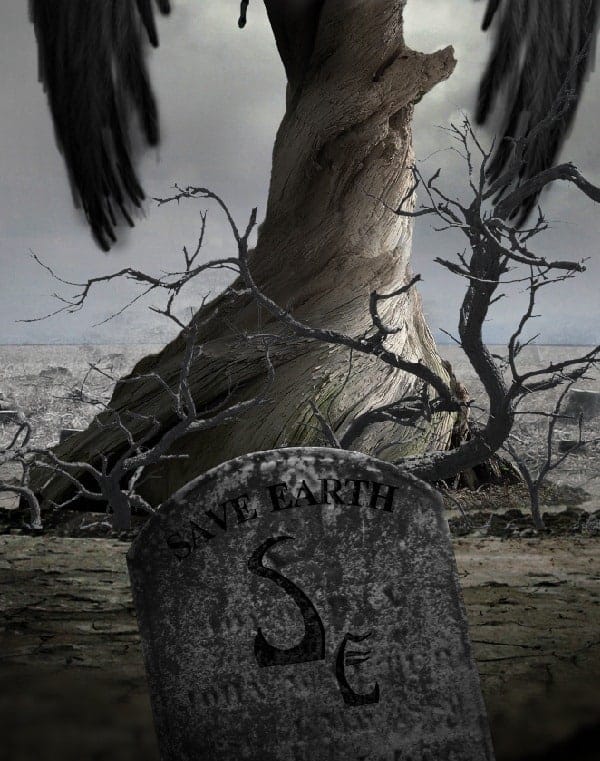
: In this step we are going to use a technique to write the text in custom shape using the Pen Tool. 1) Using the Pen Tool (P) make an arc on the tombstone as shown.2) Now select the Text Tool (T) and click on the arc to select the arc as the path of the text.3) Now type in the text "SAVE EARTH". As you can see the text follows the shape of the arc while typing.4) Open the Text Properties and reduce the spacing between the texts to -100 to get a perfect alignment.
Step 17
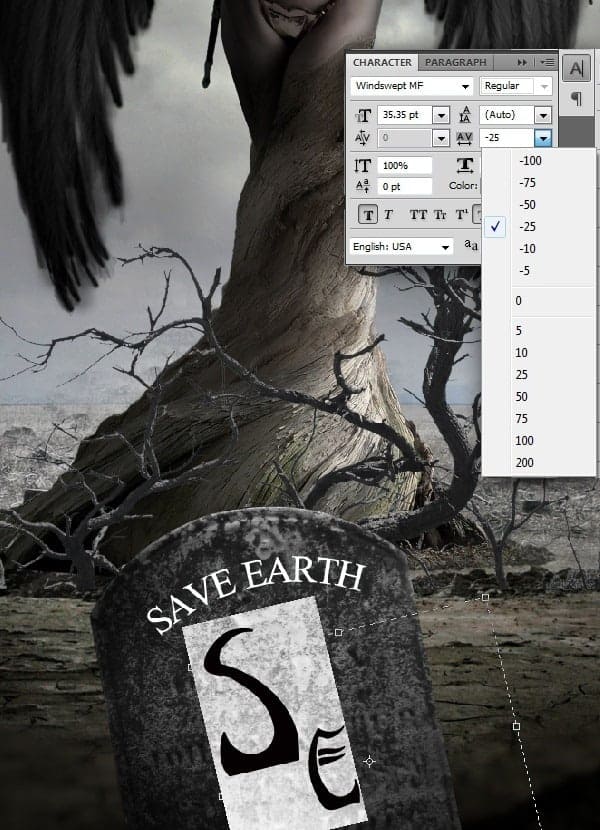
In this step we are going to work on the Text Properties to align the txt in desired shape and size. 1) Type in the text "SE" the short form of Save Earth.2) With the text selected go to Text properties and select the 'Subscript' option to get the following result.3) Keeping the text selected reduce the spacing between the letters to -25.
Step 18
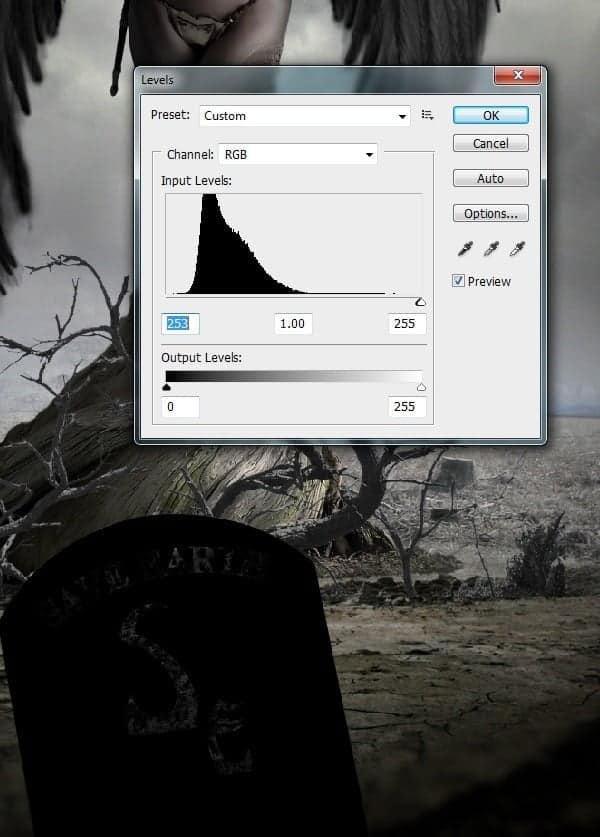
In this step we are going to create a carver inscription effect on the tombstone using the text we just created. 1) Select a mask in the shape of the shape of the text and separate the selection into a new layer and name it as 'inscription'.2) With the inscription layer selected reduce the Exposure to -0.24 and set the Gamma Correction to 0.50.3) To create the shadow within the inscription duplicate the tombstone layer and convert it into a silhouette using the Levels.4) Then place the shadow layer in between the Tombstone and the Inscription layers and move it slightly towards the left as shown.5) With the shadow layer selected go to Filter>Blur>Gaussian Blur and set the Gaussian Blur Radius to 3.0px.
Step 19
As the scene is focused on the main character the objects closer to the scene have to be blurred in order to maintain the Depth Of Field (DOF). -Merge all the Tombstone layers and go to Filters>Blur>Gaussian Blur and add a Gaussian Blur of Radius 4px.
Step 20
Now by using the Fog Brush paint the fog as shown using black color. This black fog represents the toxic that is destroying the nature.
Step 21
1) Using the technique used in step 11 cut the Dead Tree 2 from its background into a new layer.2) Now place the dead branches as shown on the left side of the scene.3) Assuming the branches being near the scene add a Gaussian Blur of Radius 6.1px to maintain the DOF.4) Similarly add few more dead branches in the scene as shown.
Step 22
In this step we are going to work with the Adjustment Layer to color correct the whole scene. 1) Create and Exposure Adjustment layer on the top of all the layers and set the Gamma Correction to 0.81.2) Similarly open the Curves Adjustment layer on the top of Exposure layer and set the Curves as shown.3) Now create an Adjustment Layer of Hue/Saturation and set the Saturation level to -23.
Step 23
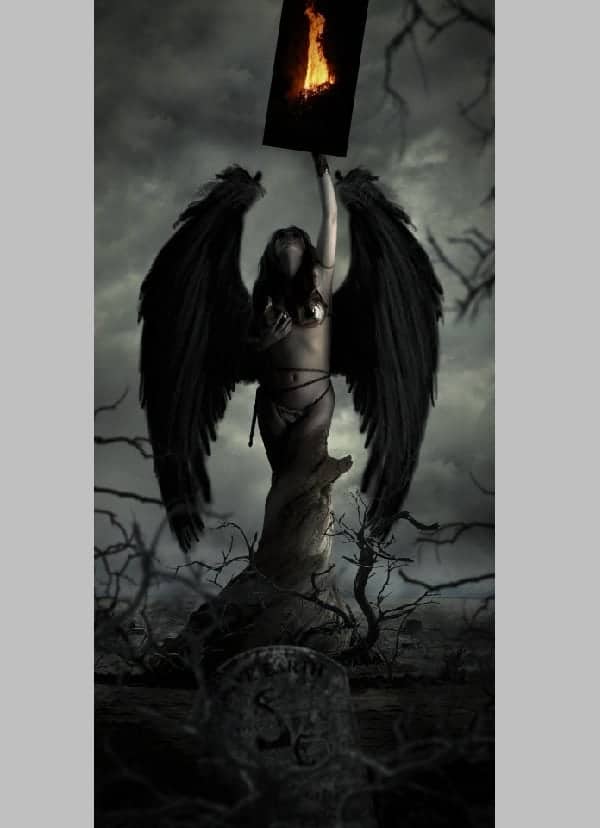
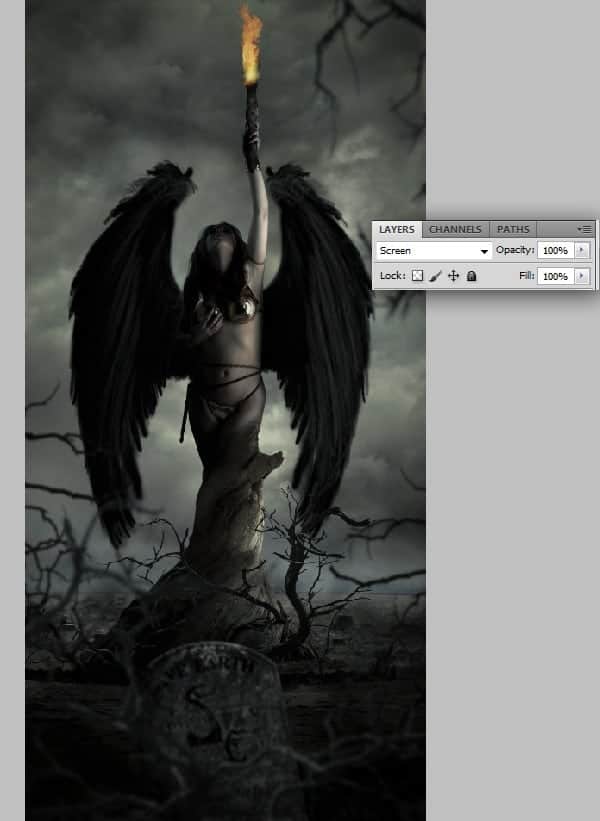
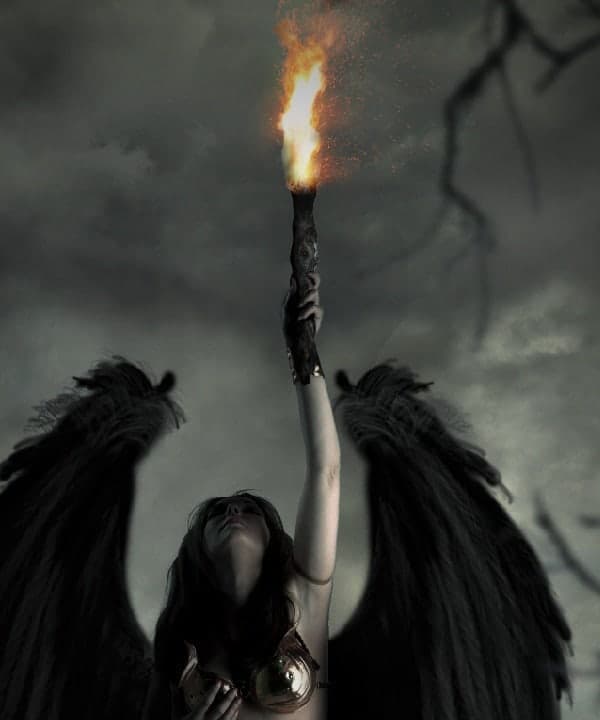
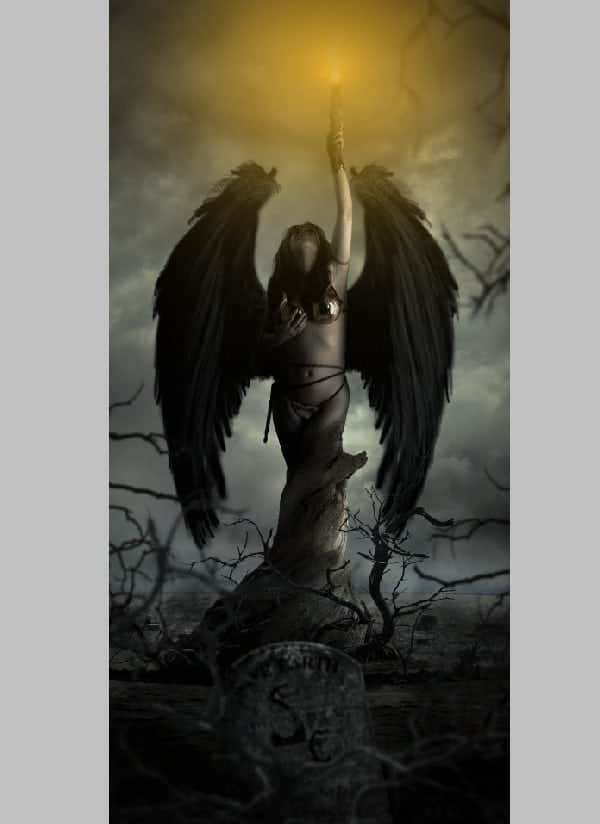
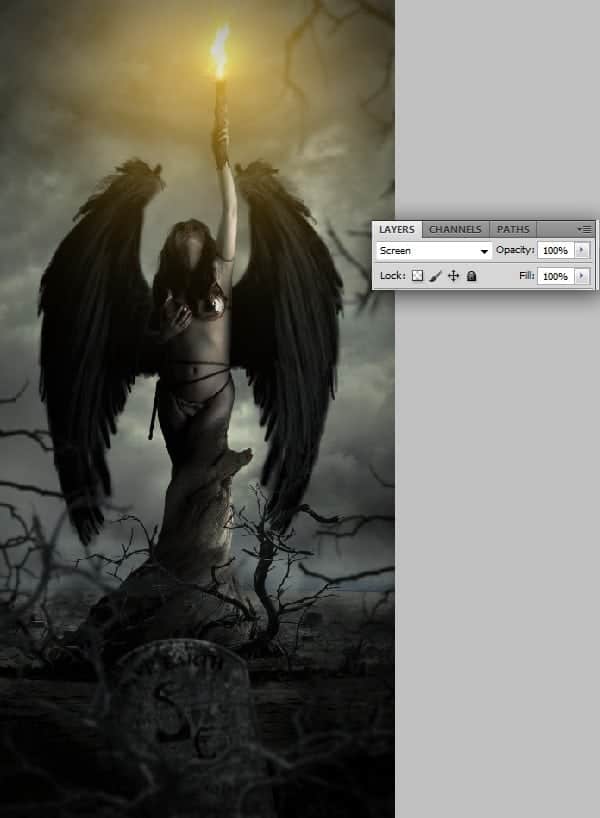
In this step we are going to create the fire on the log that the woman is holding. 1) Import the image of the Fire 1 on to the working canvas and place it as shown. Then set the Blending Mode of the layer to Screen.2) Similarly add the Roaring bonfire to the previously created fire as shown.3) Now add another image of the raging fire as shown at the ignition point of the log.
Step 24
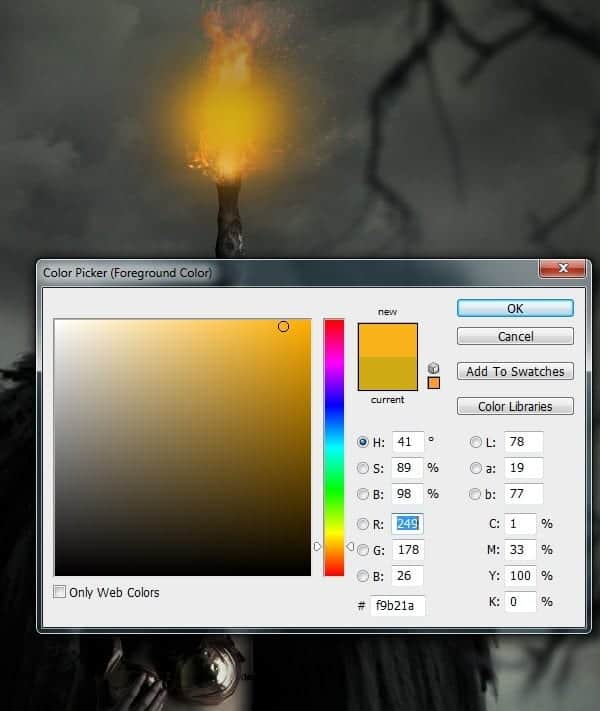
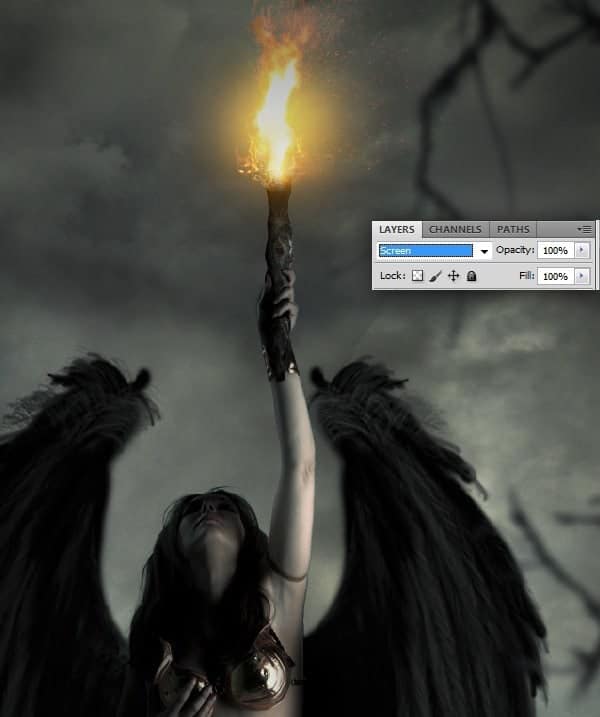
: In this step we are going to create the glow to the fire to make it more believable. 1) Using the Soft Round Brush paint the glow as shown with the color #f9b21a.2) Then set the Blending Mode of the glow layer to Screen.3) Now increase the size of the brush and paint the glow as shown.4) Then set the Blending Mode to Screen.
Step 25
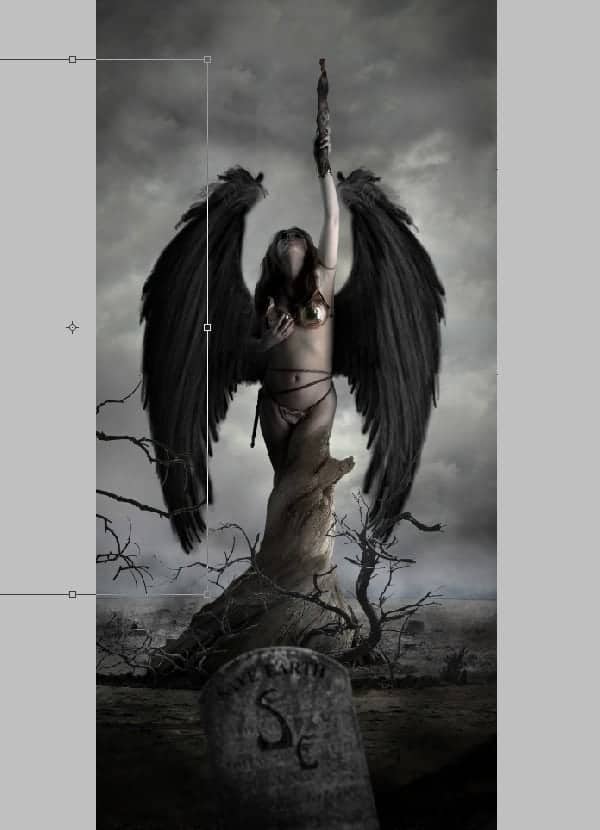
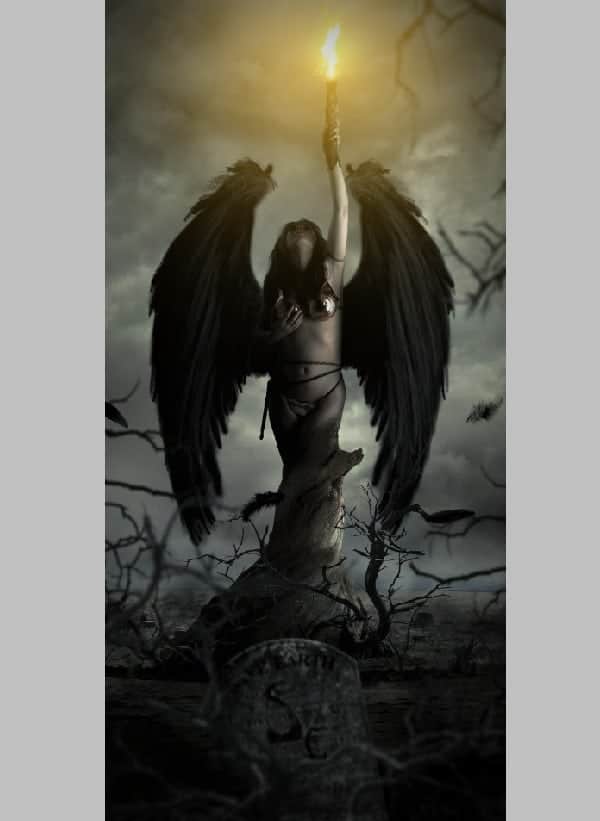
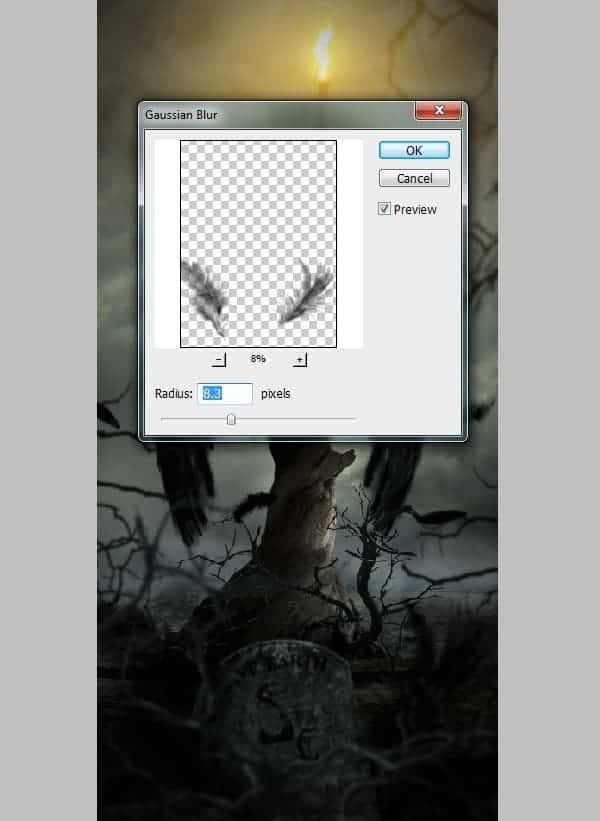
: In this step we will be creating feathers flying around in the scene. 1) Select the Feathers Brush from the Brushes pallet and paint some feathers in the scene as shown using the black color. - Then place the layer under the tombstone and dead branches layer.2) Now select another feather brush and increase the brush size. Then paint two black feathers closer to the scene as shown. Then place the layer above the tombstone layer but under the dead branches layer.3) Now to maintain the DOF of the scene add a Gaussian Blur of Radius 8.3px to the feathers.
Step 26
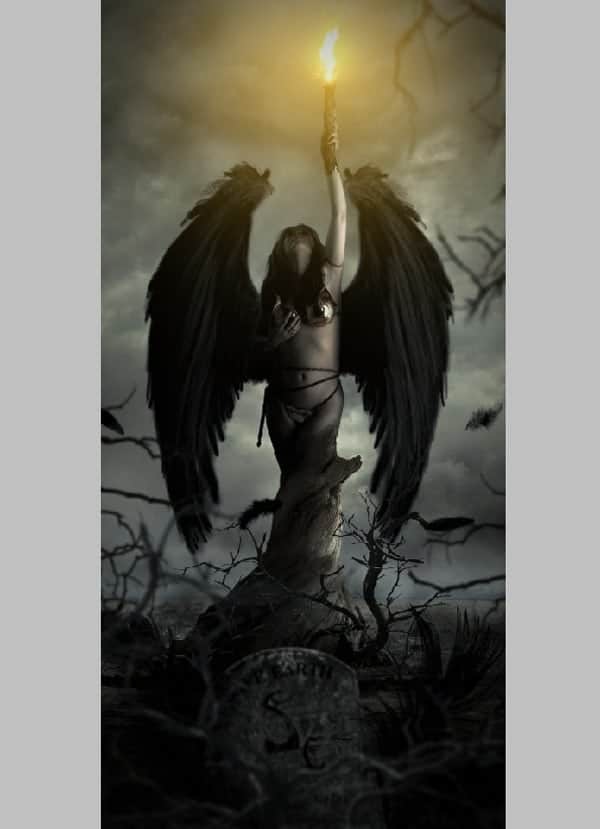
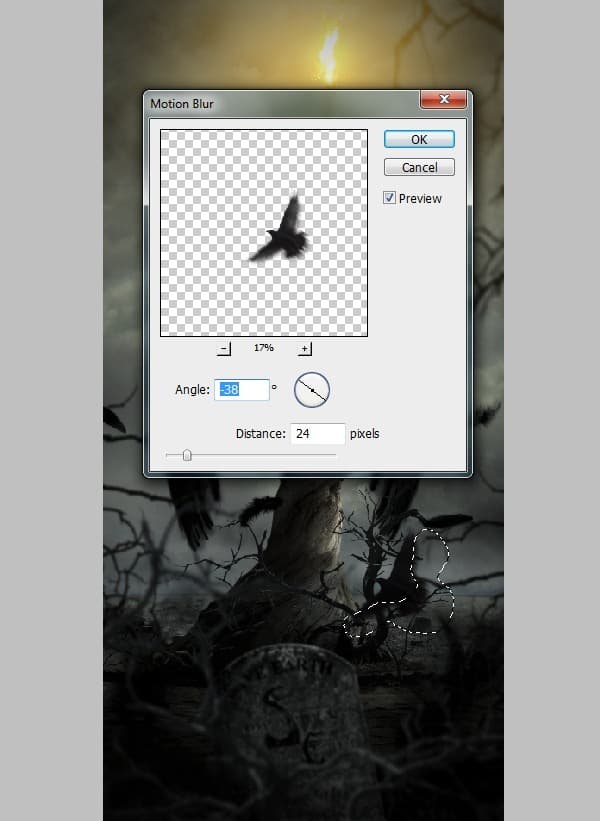
In this step we are going to add crows in the scene and add some effects to make them look real and convincing in the scene. 1) Import the image of the Crow into the scene and place it as shown. Then by using the Lasso Tool (L) draw a mask around the edges of the wings and tail as shown and add a Feather of 35px.2) Then go to Filters>Blur>Motion Blur and add a Motion Blur with Distance=24px and Angle=38.3) Then similarly add another crow in the scene as shown.
Step 27
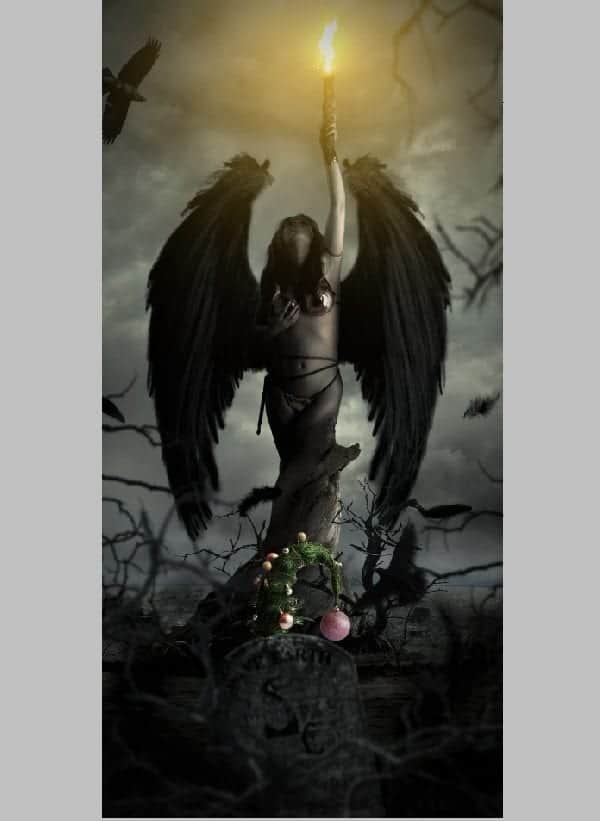
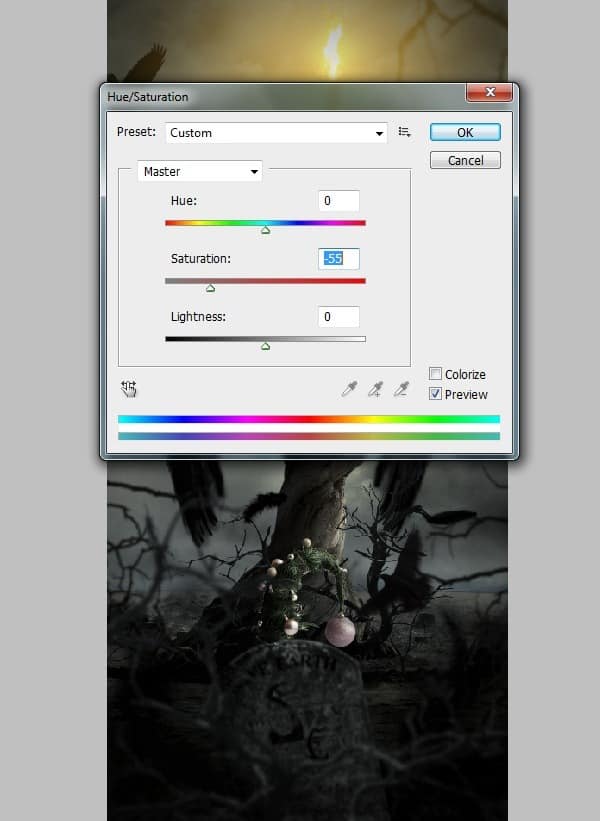
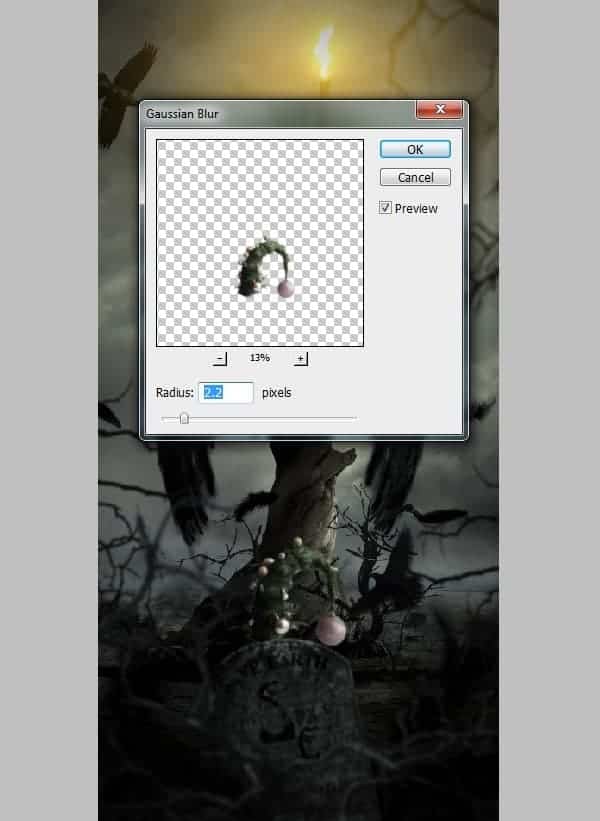
In this step we are going to create a decoration item on the tombstone. 1) Mask out the image of the Decoration plant using the Magic Wand Tool (W) and import it onto the working canvas and place it on the tombstone as shown.2) Then by using Hue/Saturation de-saturate the image to -55.3) Since the decoration item is placed on the tombstone it should match the DOF of it (Tombstone). Hence with the decoration layer selected add a Gaussian Blur of Radius 2.2px.4) Now add dark shadows to the decoration as shown to match with the lighting of the scene perfectly.
Step 28
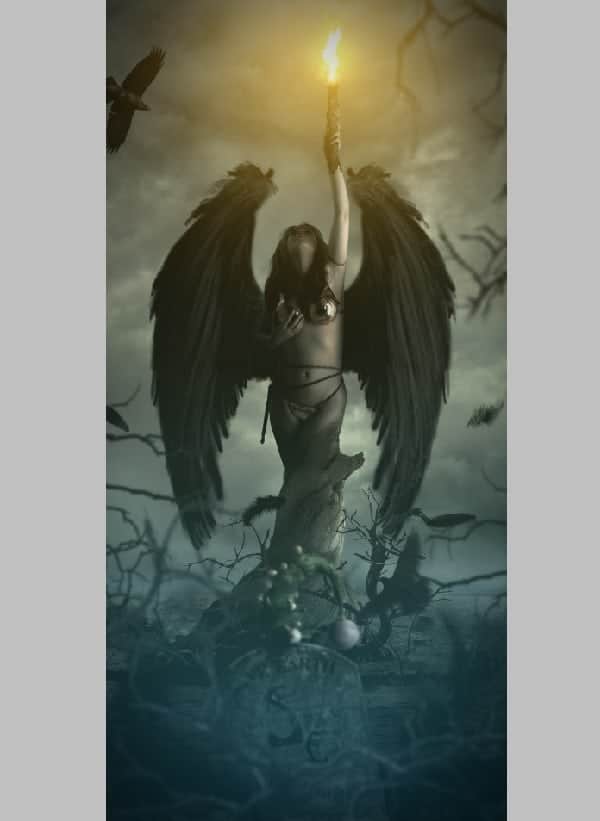
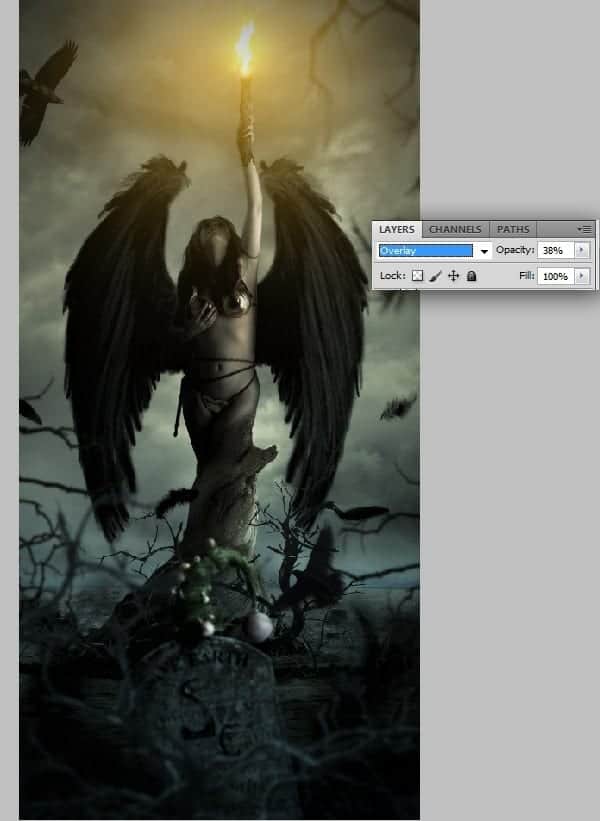
In this step we are going to color correct the scene using the Gradient. 1) Select the 'Foreground to Transparent' gradient and select sky blue color as foreground color and add the gradient to the scene as shown.2) Then set the Blending Mode of the layer to Overlay and reduce the Opacity of the layer to 38%.
Step 29
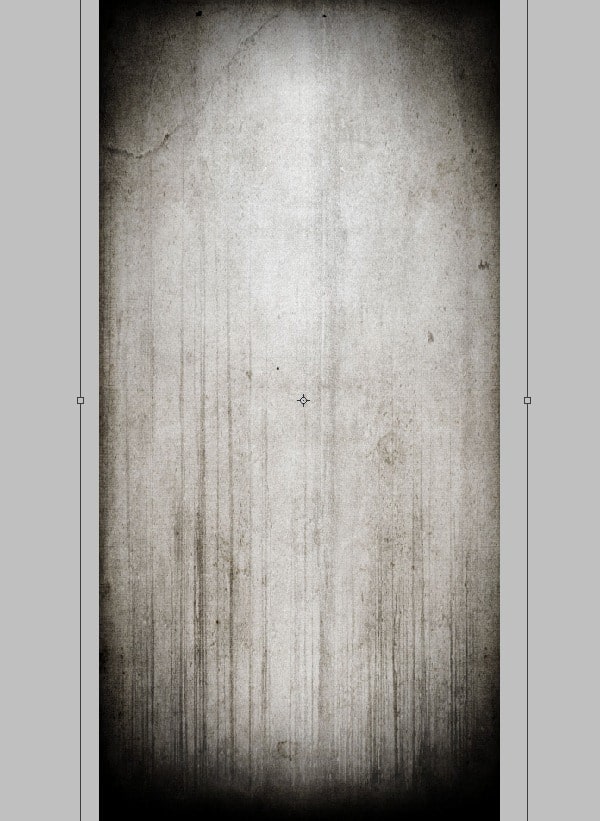
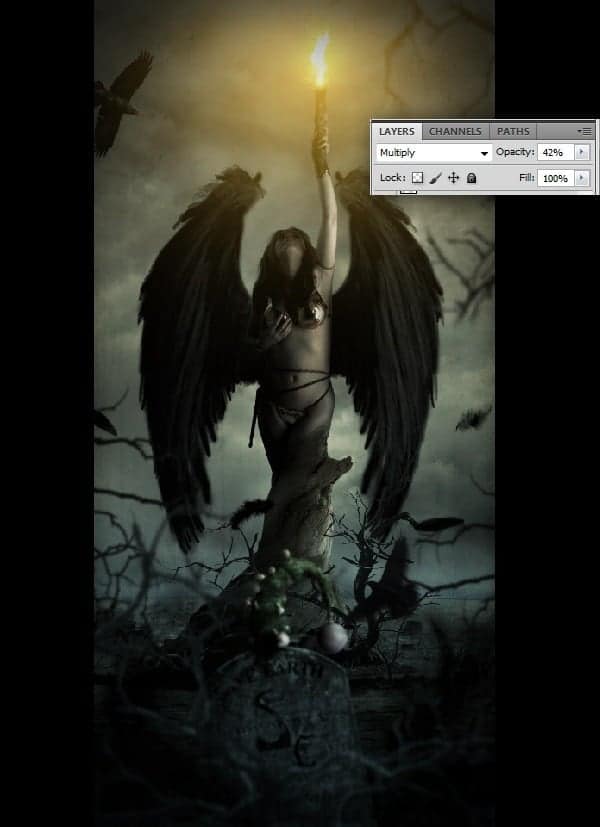
Now import the image of the Grunge Texture onto the working canvas and set the Blending mode of the texture to Multiply and reduce the Opacity of the layer to 42%.
Step 30
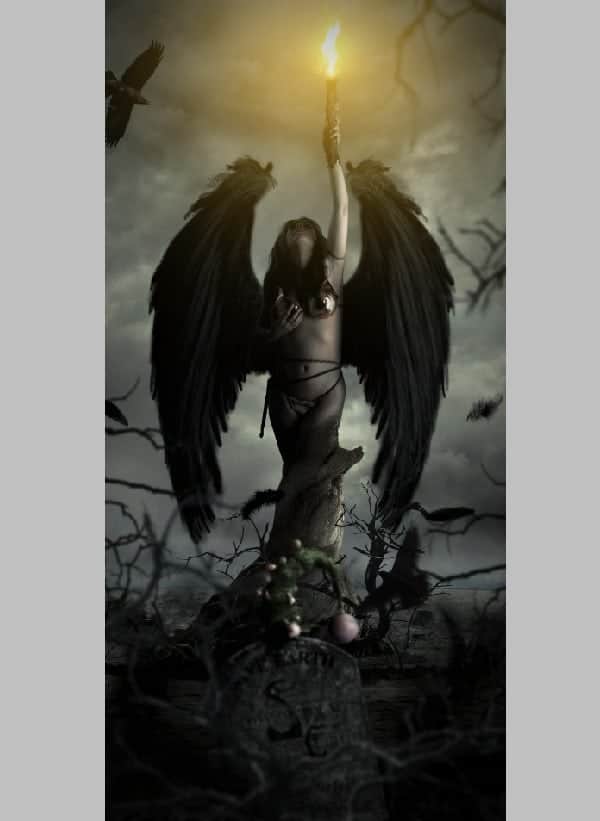
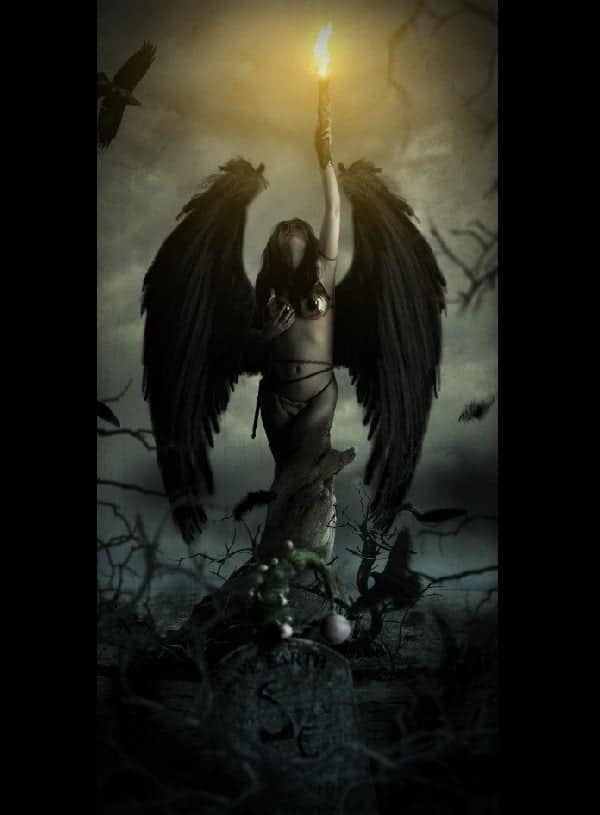
In this step we are going to create dark clouds and couple of thunders in the background. 1) Using the Soft Round Brush paint the dark clouds in the background as shown.2) Now select the Lighting Brush from the brushes pallet and paint the thunders as shown in the scene with the white color.
Step 1
Create a new canvas with the dimensions Width=1859px and Height=3860.
Step 2
Import the image of the Woman on to the canvas and create a mask around her body. Select the mask around the hair very roughly as shown. Then separate the selection into a new layer.
Step 3
In this step we are going to us the Refine Edge Tool to mask out the hair of the women with every detail.- Select the mask around the woman as shown using the Magic Wand Tool (W).
2) Now select the Refine Edge from Select>Refine Edge and select the On Black (B) from the View drop down list for a better view of the edge details.3) Now by using the Refine Radius Tool graze the edges of the hair and select New Layer from the drop down list of 'Output To' and press OK to see the magic of the tool.
Step 4
In this step we are going to color correct the image of the women.- With the women layer selected go to Image>Adjustments>Curves and set the Red and Blue curves as shown.
2) Now by using the Hue/Saturation De-Saturate the image to -31.3) To enhance the dark shadows on the women go to Image>Adjustments>Exposure and set the Exposure=-0.19 and Gamma Correction=0.86.
Step 5
In this step we are going to create a tree bark in such a way to illustrate the women evolving from it.- Import the image of the Bonsai Bark and mask out the bark into a new layer using the Lasso Tool (L).
2) Now import the bark on to the working canvas and place it on the legs of the women as shown. Then erase the top end of the bark with Soft Round Brush.3) Similarly import the bark again and complete the bark as shown.
Step 6
Since the woman is evolving from the bark we must show the semi evolution effect at the point of evolution. -Create the shadow line of the leg on to the bark as shown. This creates an illusion of the fold on the bark that is caused during the evolution of the women.
Step 7
Now we need to color correct the bark in-order to blend with the women. 1) Merge the entire bark layer and go to Image>Adjustments>Hue/Saturation and de-saturate the image to -58.2) Nowby using the Exposure Set Exposure=-0.08 and Gamma correction=0.78 to enhance the shadows on the bark.
Step 8
Fantasy scenes are never without a mystical object in the hands of the main character, hence in this step we are going to create a uniquely looking fire torch in the left hand of the women. 1) Erase the small knife that the woman is originally holding using the Eraser Tool (E).2) Now import the image of the Gnarled Log onto the working canvas and place it in the position as shown.3) Now erase the portion of the log to make the fingers visible, which makes the log look like it is held in the hands of the women.4) With the log layer selected go to Image>Adjustments>Exposure and set the Exposure to -0.19 and Gamma Correction to 0.49.
Step 9
Import the image of the BackGround on to the working canvas and place it as shown.
Step 10
In any photo-manipulation or matte painting works lighting plays an important role in making the scene look more convincing in all natural aspects. Hence in this scene we assume that the light source is on the right side of the scene. -Using the Soft Round Brush (B) paint the dark shadow on the left side of the women and the bark as shown.
Step 11
As we said in the intro that the nature is holding it's last light of hope from dying, we need to add few dead branches in the scene to create the dry feel in the scene. In this step we are going to cut the dead tree from its image and place it in our scene. 1) Import the image of the Dead Tree 1 and select the Blue Channel from the 'Channels' pallet. The go to Image>Calculations and select the Blue channel from the channel drop down list.Â2) Now by using the Levels make the image into a complete silhouette.3) Select the main image and go to Select>Load Selection and select the Alpha 1 from the Channel Drop down list and press OK to select the mask around the dead tree.4) Now separate the selection into a new layer.5) Now import the dead tree branches on to the working canvas and place them near the base of the bark as shown.
Step 12
In this step we are going to add wings to the woman. 1) Import the image of the Wings into the scene and place them on the back of the woman as shown.2) Considering the lighting principles of the scene paint the dark shadow on the right wing.
Step 13
: In this step we are going to create a deforested landscape in the background. 1) Import the Deforestation image on to the canvas and place it as shown.2) Using the Move Tool (V) transform the image to fit the prospective of the scene. Lower the Opacity of the deforested image to 55% before transforming for a better view of the original image prospective.3) Now by using the Hue/Saturation reduce the Saturation level of theimage to -65.4) Now by using the Eraser Tool (E) erase the deforested image as shown, and then lower the Opacity to 76% to fit perfectly in the background.5) Similarly create the deforested landscape on the left side of the scene as shown.
Step 14
In this step we are going to add a tombstone in the scene representing the end of the nature. -Cut the Tombstonefrom the original image using Pen Tool (P), then import it onto the working canvas and place it at the bottom of the scene as shown.
Step 15
1) With the tombstone layer selected go to Image>Adjustments>Black and White and convert the image into gray scale.2) Now enhance the dark shades of the tombstone using Exposure. Set the Exposure to -0.24 and Gamma Correction to 0.72.3) Now by using the Soft Round Brush (B) paint dark shadow on the left side of the tombstone as shown.
Step 16
: In this step we are going to use a technique to write the text in custom shape using the Pen Tool. 1) Using the Pen Tool (P) make an arc on the tombstone as shown.2) Now select the Text Tool (T) and click on the arc to select the arc as the path of the text.3) Now type in the text "SAVE EARTH". As you can see the text follows the shape of the arc while typing.4) Open the Text Properties and reduce the spacing between the texts to -100 to get a perfect alignment.
Step 17
In this step we are going to work on the Text Properties to align the txt in desired shape and size. 1) Type in the text "SE" the short form of Save Earth.2) With the text selected go to Text properties and select the 'Subscript' option to get the following result.3) Keeping the text selected reduce the spacing between the letters to -25.
Step 18
In this step we are going to create a carver inscription effect on the tombstone using the text we just created. 1) Select a mask in the shape of the shape of the text and separate the selection into a new layer and name it as 'inscription'.2) With the inscription layer selected reduce the Exposure to -0.24 and set the Gamma Correction to 0.50.3) To create the shadow within the inscription duplicate the tombstone layer and convert it into a silhouette using the Levels.4) Then place the shadow layer in between the Tombstone and the Inscription layers and move it slightly towards the left as shown.5) With the shadow layer selected go to Filter>Blur>Gaussian Blur and set the Gaussian Blur Radius to 3.0px.
Step 19
As the scene is focused on the main character the objects closer to the scene have to be blurred in order to maintain the Depth Of Field (DOF). -Merge all the Tombstone layers and go to Filters>Blur>Gaussian Blur and add a Gaussian Blur of Radius 4px.
Step 20
Now by using the Fog Brush paint the fog as shown using black color. This black fog represents the toxic that is destroying the nature.
Step 21
1) Using the technique used in step 11 cut the Dead Tree 2 from its background into a new layer.2) Now place the dead branches as shown on the left side of the scene.3) Assuming the branches being near the scene add a Gaussian Blur of Radius 6.1px to maintain the DOF.4) Similarly add few more dead branches in the scene as shown.
Step 22
In this step we are going to work with the Adjustment Layer to color correct the whole scene. 1) Create and Exposure Adjustment layer on the top of all the layers and set the Gamma Correction to 0.81.2) Similarly open the Curves Adjustment layer on the top of Exposure layer and set the Curves as shown.3) Now create an Adjustment Layer of Hue/Saturation and set the Saturation level to -23.
Step 23
In this step we are going to create the fire on the log that the woman is holding. 1) Import the image of the Fire 1 on to the working canvas and place it as shown. Then set the Blending Mode of the layer to Screen.2) Similarly add the Roaring bonfire to the previously created fire as shown.3) Now add another image of the raging fire as shown at the ignition point of the log.
Step 24
: In this step we are going to create the glow to the fire to make it more believable. 1) Using the Soft Round Brush paint the glow as shown with the color #f9b21a.2) Then set the Blending Mode of the glow layer to Screen.3) Now increase the size of the brush and paint the glow as shown.4) Then set the Blending Mode to Screen.
Step 25
: In this step we will be creating feathers flying around in the scene. 1) Select the Feathers Brush from the Brushes pallet and paint some feathers in the scene as shown using the black color. - Then place the layer under the tombstone and dead branches layer.2) Now select another feather brush and increase the brush size. Then paint two black feathers closer to the scene as shown. Then place the layer above the tombstone layer but under the dead branches layer.3) Now to maintain the DOF of the scene add a Gaussian Blur of Radius 8.3px to the feathers.
Step 26
In this step we are going to add crows in the scene and add some effects to make them look real and convincing in the scene. 1) Import the image of the Crow into the scene and place it as shown. Then by using the Lasso Tool (L) draw a mask around the edges of the wings and tail as shown and add a Feather of 35px.2) Then go to Filters>Blur>Motion Blur and add a Motion Blur with Distance=24px and Angle=38.3) Then similarly add another crow in the scene as shown.
Step 27
In this step we are going to create a decoration item on the tombstone. 1) Mask out the image of the Decoration plant using the Magic Wand Tool (W) and import it onto the working canvas and place it on the tombstone as shown.2) Then by using Hue/Saturation de-saturate the image to -55.3) Since the decoration item is placed on the tombstone it should match the DOF of it (Tombstone). Hence with the decoration layer selected add a Gaussian Blur of Radius 2.2px.4) Now add dark shadows to the decoration as shown to match with the lighting of the scene perfectly.
Step 28
In this step we are going to color correct the scene using the Gradient. 1) Select the 'Foreground to Transparent' gradient and select sky blue color as foreground color and add the gradient to the scene as shown.2) Then set the Blending Mode of the layer to Overlay and reduce the Opacity of the layer to 38%.
Step 29
Now import the image of the Grunge Texture onto the working canvas and set the Blending mode of the texture to Multiply and reduce the Opacity of the layer to 42%.
Step 30
In this step we are going to create dark clouds and couple of thunders in the background. 1) Using the Soft Round Brush paint the dark clouds in the background as shown.2) Now select the Lighting Brush from the brushes pallet and paint the thunders as shown in the scene with the white color.



























0 comments:
Post a Comment